Creating a Master Weld with the REALWELD System
| Whether it is the right book or an actual tool, a big factor in establishing any curriculum is having the right tools for the classroom or lab activity at hand. This especially applies to weld training.
When a welding school program teaches a specific process or weld, it’s important that they have access to a machine capable of producing those types of welds. The same reasoning applies to welding procedure specifications. If your program teaches a drag technique that uses a lower work angle instead of a straight push, you should be able to teach the weld using your preferred method. The REALWELD® advanced welding training system includes a set number of Welding Procedure Specifications (WPS) that cannot be modified or deleted. However, this will not limit the instructor’s ability to create and teach a weld exactly how they want to teach it. This installment of Tips and Tricks will show the instructor how to create a Master Weld. HOW TO CREATE A MASTER WELD: |
| The first step in the creation of any Master Weld is finding a starting point. It’s helpful to locate an existing default REALWELD WPS to use as a template.
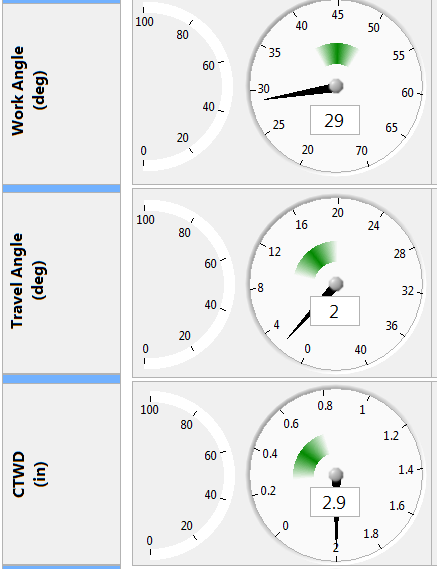
STEP 1.Login as the generic trainee ”student”. The password is “s”. STEP 2.Scroll thru the Default curriculum to find a weld similar to the weld you wish to create. For example if you plan on creating your version of a Single-Pass GMAW Horizontal Fillet, choose a similar description found on the provided curriculum list. STEP 3.Set up the REALWELD system fixture and coupon to match the default WPS you have selected. STEP 4.Set up the power source to meet the specifications you wish to use with your new weld. If these settings are not the same as the default WPS you selected, be sure to document your new settings. STEP 5.Verify that the “Right to Left” / “Left to Right” direction of travel is set correctly. Note: Travel Progression must be followed. A PUSH remains as a push until changed in the WPS Editor (Instructor Menu). This will affect the recorded numerical value for a particular weld’s Travel Angle. To change push travel to drag travel, begin by accessing the Instructor Mode, and then create and name your new weld (see Step 11). Change the Travel Progression from PUSH to PULL. Then return to the trainee menu, repeat the above steps, and continue on from Step 6 to complete the Master Weld process. STEP 6.Change menu settings to AUDIO OFF, and ARC ON. Prepare to weld. STEP 7.Create a real weld without the benefit of following the current REALWELD WPS and audio cues as a guide. Use your personal parameters. Create the weld your way —just like in the shop. Even without the “Audio On” cues, the weld continues to be scored and plotted. STEP 8.There are two sets of dials for each parameter. The dials on the left are marked from “0” to “100”. They will reflect the percentage of time spent within the control limits for a completed weld. The dials on the right represent an actual value. For example, next to WORK ANGLE, the value in the small box may have a numerical average of “29”. This is the actual degree of angle of the welding device. The right-side dial for TRAVEL ANGLE might read “2”. This would be the actual Travel Angle. Those values for a completed weld are the average values for the entire length of the bead. RECORD THESE COMPLETED WELD AVERAGES FOR EACH INDIVIDUAL PARAMETER. STEP 9.Repeat same above steps for three or four more welds. RECORD THESE AVERAGES FOR EACH PARAMETER (FOR EACH SEPARATE WELD). STEP 10.Average each parameter for all of the individual welds. For example, if you created three complete welds and your WORK ANGLE values were 47 (weld 1), 50 (weld 2) and 44 (weld 3) then your WORK STEP 11.Logout and SWITCH USERS. Login as an instructor. Find and select the original WPS that was used as the Master Weld template. Press OPEN. STEP 12.Find and select the SAVE AS icon at the top left corner of the WPS Editor screen. |
NAME THE MASTER WELD.
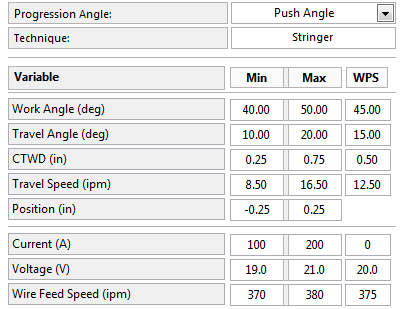
STEP 13.Introduce your Master Weld average values into the Editor. Change the Min and Max values to reflect your averages for each individual parameter. The Min Max values also establish the range (difficulty level). Change the value in the WPS column to reflect your personal parameters which will now be found on the trainees’ WPS.
STEP 14.SAVE and EXIT. Add the Master Weld WPS to a Curriculum. Attach the Curriculum, to a User. Logout and switch users.
STEP 15.Login as the trainee you selected in Step 14. From the Curriculum find and select the new weld. Verify the changes on the WPS. Create a weld with Audio On. Scoring, plots, and Audio Cues should now reflect the instructor’s way of welding. It is important to remember when producing a MULTI-PASS Master Weld, changes will need to be made for each individual pass.
Finally, note that it is possible to capture a Master Weld from any welding operator. Using the technology detailed here, it is possible to capture a Master Weld from an accomplished welding operator in any field, including those employed by the same employers you hope to place your students with as they graduate from your program.
In that sense, it is possible to prove to the employer that your students can perform the same weld their most accomplished welding operators can perform. Train your welders using your angles, speeds, and techniques. Explore the Master Weld process.


